微信小程序之高德地图多点路线规划过程示例详解
脚本宝典收集整理的这篇文章主要介绍了微信小程序之高德地图多点路线规划过程示例详解,脚本宝典觉得挺不错的,现在分享给大家,也给大家做个参考。
调用
如何调用高德api?
高德官方给出的https://lbs.amap.com/api/wx/summary/开放文档比较详细:
第一步,注册高德开发者
第二部,去控制台创建应用

即点击右上角的控制平台创建应用

创建应用绑定服务记得选择微信小程序;同时在https://lbs.amap.com/api/wx/gettingstarted中下载开发包
第三步,登陆微信公众平台在开发设置中将高德域名配置上
第四步,打开微信开发者工具,打开微信小程序,在项目中新建一个libs文件夹
将在高德官网上下载得到的开发包解压,将其中的 amap-wx.js 文件放在libs文件夹下

同时创建config.js
在其他界面js部分中即可调用高德api
var amapFile = require('../../libs/amap-wx.js');
var config = require('../../libs/config.js');
两点之间的导航
这是实现多点路线规划的基础,非常重要!!!
实现效果


以驾车为例,注:界面使用的是colorui
wXMl部分:
<scroll-view scroll-x class="bg-whITe nav text-center"> <view class="cu-item {{index==Tabcur?'text-blue cur':''}}" wx:for="{{4}}" wx:key bindtap="tabSelect" data-id="{{index}}"> {{method[index]}} </view> </scroll-view> <view class="map"> <view bindtap='getFormAddress'> <view class="cu-form-group"> <view class="title">出发地</view> <input placeholder="出发地" tyPE="text" name="" bindinput="" value='{{markers[0].name}}' /> </view> </view> <view bindtap='getToAddress'> <view class="cu-form-group"> <view class="title">目的地</view> <input placeholder="目的地" type="text" name="" bindinput="" value='{{markers[1].name}}' /> </view> </view> <view class="flex" wx:if="{{TabCur==0||TabCur==1}}"> <button class="cu-BTn bg-blue lg" bindtap = 'getSure'>确定</button> </view> </view> <view> <view class="map_box" wx:if="{{TabCur==0}}"> <;map id="navi_map" longitude="{{markers[0].longitude}}" latitude="{{markers[0].latitude}}" scale="12" markers="{{markers}}" polyline="{{polyline}}"></map> </view> <view class="text_box" wx:if='{{TabCur==0}}'> <view class="text">{{distance}}</view> <view class="text">{{cost}}</view> <view class="detail_button" bindtouchstart="goDetail" wx:if="{{state==1}}">详情</view> </view> </view>
js部分:
var amapFile = require('../../libs/amap-wx.js');
var config = require('../../libs/config.js');
const app = getApp()
Page({
 /**
 * 页面的初始数据
 */
 data: {
 markers: [{
 iconPath: "../../img/mapicon_navi_s.png",
 id: 0,
 latitude: 39.989643,
 longitude: 116.481028,
 width: 23,
 height: 33
 },{
 iconPath: "../../img/mapicon_navi_e.png",
 id: 0,
 latitude: 39.90816,
 longitude: 116.434446,
 width: 24,
 height: 34
 }],
 distance: '',
 cost: '',
 state: 0,
 method:['驾车','公交','骑行','步行'],
 index:0,
 TabCur:0,
 polyline: [],
 transits: []
 },
 /**
 * 生命周期函数--监听页面加载
 */
 onLoad: function(options) {
 var that = this;
 wx.showLoading({
 title: "定位中",
 mask: true
 })
 wx.getLocation({
 type: 'gcj02',
 altitude: true, //高精度定位
 success: function(res) {
 console.info(res);
 var latitude = res.latitude
 var longitude = res.longitude
 var speed = res.speed
 var accuracy = res.accuracy
 that.setData({
 markers: [{
 name: '当前位置',
 latitude: latitude,
 longitude: longitude
 }, {
 name: '您要去哪儿?',
 latitude: '',
 longitude: ''
 }]
 })
 },
 fail: function() {
 wx.showToast({
 title: "定位失败",
 icon: "none"
 })
 },
 complete: function() {
 wx.hideLoading()
 }
 })
 },
 //选择器改变函数
 tabSelect(e) {
 this.setData({
 TabCur: e.currentTarget.dataset.id,
 scrollLeft: (e.currentTarget.dataset.id - 1) * 60
 })
},
//获取出发地
 getFormAddress: function() {
 var that = this;
 wx.chooseLocation({
 success: function(res) {
 var name = res.name
 var address = res.address
 var latitude = res.latitude
 var longitude = res.longitude
 var markesName = "markers[" + 0 + "].name";
 var markesLatitude = "markers[" + 0 + "].latitude";
 var markeslongitude = "markers[" + 0 + "].longitude";
 var markesiconPath = "markers[" + 0 + "].iconPath";
 that.setData({
 [markesName]: name,
 [markesLatitude]: latitude,
 [markeslongitude]: longitude,
 [markesiconPath]: "../../img/mapicon_navi_s.png"
 })
 },
 fail: function() {
 wx.showToast({
 title: '定位失败',
 icon: "none"
 })
 },
 complete: function() {
 //隐藏定位中信息进度
 wx.hideLoading()
 }
 })
 },
//获取目的地
 getToAddress: function() {
 var that = this;
 wx.chooseLocation({
 success: function(res) {
 console.LOG(res);
 var name = res.name
 var address = res.address
 var latitude = res.latitude
 var longitude = res.longitude
 var markesName = "markers[" + 1 + "].name";
 var markesLatitude = "markers[" + 1 + "].latitude";
 var markeslongitude = "markers[" + 1 + "].longitude";
 var markesiconPath = "markers[" + 1 + "].iconPath";
 that.setData({
 [markesName]: name,
 [markesLatitude]: latitude,
 [markeslongitude]: longitude,
 [markesiconPath]: "../../img/mapicon_navi_e.png"
 })
 },
 fail: function() {
 wx.showToast({
 title: '定位失败',
 icon: "none"
 })
 },
 complete: function() {
 //隐藏定位中信息进度
 wx.hideLoading()
 }
 })
 },
 /**
 * 确定
 */
 getSure: function() {
 var that = this;
 var origin = that.data.markers[0].longitude + ',' + that.data.markers[0].latitude;//出发地
var destination = that.data.markers[1].longitude + ',' + that.data.markers[1].latitude; //目的地
var TabCur=this.data.TabCur;
app.origin = origin;
app.destination = destination;
var key = config.Config.key;
var myAmapFun = new amapFile.AMapWX({
 key: key
 });
 if(TabCur==0){
  myAmapFun.getDrivingRoute({//获取驾车路线
  origin: origin,
  destination: destination,
  success: function(data) {
  var points = [];
  if (data.paths && data.paths[0] && data.paths[0].steps) {
  var steps = data.paths[0].steps;
  for (var i = 0; i < steps.length; i++) {
  var poLen = steps[i].polyline.split(';');
  for (var j = 0; j < poLen.length; j++) {
  points.push({
  longitude: parseFloat(poLen[j].split(',')[0]),
  latitude: parseFloat(poLen[j].split(',')[1])
  })
  }
  }
  }
  that.setData({//将路线在地图上画出来
  state: 1,
  polyline: [{
  points: points,
  color: "#0091ff",
  width: 6
  }]
  });
  if (data.paths[0] && data.paths[0].distance) {
  that.setData({
  distance: data.paths[0].distance + '米'
  });
  }
  if (data.taxi_cost) {
  that.setData({
  cost: '打车约' + parseInt(data.taxi_cost) + '元'
  });
  }
  }
 })
 }
 },
/**
 * 详情页
 */
goDetail: function() {
  var TabCur=this.data.TabCur;
  if(TabCur==0){
  wx.navigateTo({
  url: '../detail/detail'
  })
 }
 },
})
wxss部分:
.flex-style{
 display: -webkit-box;
 display: -webkit-flex;
 display: flex;
 }
 .flex-item{
 height: 35px;
 line-height: 35px;
 text-align: center;
 -webkit-box-flex: 1;
 -webkit-flex: 1;
 flex: 1
 }
 .flex-item.active{
 color:#0091ff;
 }
 .map_title{
 position:absolute;
 top: 10px;
 bottom: 110px;
 left: 0px;
 right: 0px;
 }
 .map_btn{
 position:absolute;
 top: 150px;
 bottom: 220px;
 left: 0px;
 right: 0px;
 }
 .map_box{
 position:absolute;
 top: 187px;
 bottom: 70px;
 left: 0px;
 right: 0px;
 }
 #navi_map{
 width: 100%;
 height: 100%;
 }
 .text_box{

 position:absolute;
 height: 70px;
 bottom: 0px;
 left: 0px;
 right: 0px;
 }
 .text_box .text{
 margin: 15px;
 }
详情页部分:
htML部分:
<view class="text_box" wx:for="{{steps}}" wx:for-item="i" wx:key="j">
 {{i.instruction}}
</view>
js部分:
var amapFile = require('../../libs/amap-wx.js');
var config = require('../../libs/config.js');
const app = getApp()
Page({
 data: {
 steps: {}
 },
 onLoad: function () {
 var that = this;
 var key = config.Config.key;
 var myAmapFun = new amapFile.AMapWX({ key: key });
 myAmapFun.getDrivingRoute({
 origin: app.origin,
 destination: app.destination,
 success: function (data) {
 if (data.paths && data.paths[0] && data.paths[0].steps) {
 that.setData({
 steps: data.paths[0].steps
 });
 }
 },
 fail: function (info) {
 }
 })
 }
})
wxss部分:
Page{

}
.text_box{
 margin: 0 15px;
 padding: 15px 0;
 border-bottom: 1px solid #c3c3c3;
 font-Size: 13px;
}
.text_box .text_item{display:inline-block;line-height: 8px;}
其他公交、骑行、步行方法与驾车类似,可以查看高德开放文档学习
我的设计上公交可以查看不同城市的公交路线,而非只能查看一个城市的,实现很简单,在界面上添加了一个选择器城市参数传至city,即可查看不同城市的公交路线

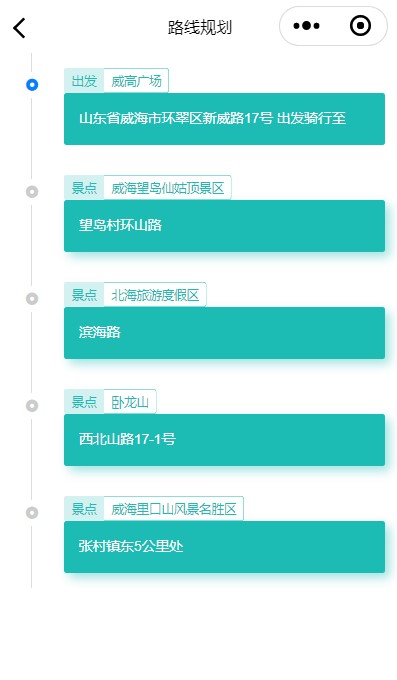
多点路线规划
实现效果:可以选择出发地,选择不同的景点,根据不同的出行方式给出一条距离最短的路径

实现思路:
- 获取到周边的景点位置等相关信息
- 将用户添加的景点信息传到下一个页面进行计算
- 获得所有可能的路线并计算每一条路线的长度找出距离最短的一条
踩坑
- 一开始打算利用深度优先搜索算法实现,但是发现在现实的地图中,任意两点之间几乎都存在路,并不像抽象后的数学题一样。于是最后使用了全排列的方法获取到了所有的路线。
- 在全排列的过程中需要递归调用函数,涉及到传参问题,需要将自定义的带参函数写在Page外,写在Page里的话,我尝试了很多方式调用函数都会报错。
- 在使用高德api获取路径的函数后,无法计算每一段路线的长度,最后发现是在函数调用的过程中,存储路线距离的数组只是暂存的,在函数调用后无法使用该数组来计算距离。于是最后我在函数调用的过程中计算每一条路线的长度并进行比较,最后用this.setData的方法将最后得到的路线展示在界面上。
具体实现
- 获取出发地、出行方式并赋值给全局变量传递掉下一个界面,如
app.origin = origin。 - 利用
getPoiAround函数获取到周边的景点信息,querykeywords可以固定设置为景区,将返回的前二十条景区信息展示在界面上。 - 将用户选择的景点信息存入数组并传递到下一个界面进行计算。
- 利用全排列获取到所有可能的路线并去重。
- 计算每一条路线的长度并找到最小的一条将其展示在界面上。
注:获取到每一条路线距离的方法和获取到两个地点之间不同出行方式路线的方法在前面两点之间的导航部分,多点之间的路线导航其实就是将多个两点之间的路线导航连在了一起。先将前面的两点之间的不同出行方式导航实现后,改动细微的部分,再加入全排列的算法和大小比较的算法即可实现,在此就不贴出源码。
希望我的思路能给予你启发~
可优化部分
querykeywords可以设置为让用户选择不同的标签,如:户外、娱乐、美食、宾馆等等。- 可让用户选择不同标签的地点将其存入数组计算一条出行的最短路径。
- 可以在最终的展示界面显示地图让用户更直观地查看各个地点之间的方位及距离信息。
- 最优导航形式:实时导航。
注:以上四条是我暂时想到的可优化的部分,算是给自己挖了一个坑,等我填完来这里写个实现方式。
到此这篇关于微信小程序之高德地图多点路线规划过程示例详解的文章就介绍到这了,更多相关高德地图多点路线规划内容请搜索脚本宝典以前的文章或继续浏览下面的相关文章希望大家以后多多支持脚本宝典!
脚本宝典总结
以上是脚本宝典为你收集整理的微信小程序之高德地图多点路线规划过程示例详解全部内容,希望文章能够帮你解决微信小程序之高德地图多点路线规划过程示例详解所遇到的问题。
本图文内容来源于网友网络收集整理提供,作为学习参考使用,版权属于原作者。
如您有任何意见或建议可联系处理。小编QQ:384754419,请注明来意。
- html font标签如何设置字体大小?html font标签属性用法介绍 2022-05-16
- vue3+TypeScript+vue-router的使用方法 2022-04-16
- vue3获取当前路由地址 2022-04-16
- 如何利用React实现图片识别App 2022-04-16
- JavaScript展开运算符和剩余运算符的区别详解 2022-04-16
- 微信小程序中使用vant框架的具体步骤 2022-04-16
- Vue elementUI表单嵌套表格并对每行进行校验详解 2022-04-16
- 如何利用Typescript封装本地存储 2022-04-16
- 微信小程序中wxs文件的一些妙用分享 2022-04-16
- JavaScript的Set数据结构详解 2022-04-16
- html font标签如何设置字体大小?html font标签属性用法介绍
- html中的document对象是什么?一篇文章让你了解document对象
- xhtml与html之间有什么区别?xhtml与html之间的异同分析
- HTML <a> download属性使用方法详解
- html中b标签和strong标签的区别是什么?b和strong区别的总结
- html下拉菜单怎么做?html下拉菜单的代码实例介绍
- html单选按钮默认选中怎么做?input标签的单选按钮用法实例
- html文本域标签属性有哪些?html文本域标签属性用法介绍
- html图片怎么等比例缩放?html img图片缩放方法总结(附实例)
- html中col标签中的汉字如何居中?html col标签的基本使用(内有实例)