分布式文档存储数据库之MongoDB分片集群的问题
脚本宝典收集整理的这篇文章主要介绍了分布式文档存储数据库之MongoDB分片集群的问题,脚本宝典觉得挺不错的,现在分享给大家,也给大家做个参考。
前文我们聊到了mongodb的副本集以及配置副本集,回顾请参考 https://www.js-code.com/article/167270.htm 今天我们来聊下mongodb的分片;
1、什么是分片?为什么要分片?
我们知道数据库服务器一般出现瓶颈是在磁盘io上,或者高并发网络io,又或者单台server的cpu、内存等等一系列原因;于是,为了解决这些瓶颈问题,我们就必须扩展服务器性能;通常扩展服务器有向上扩展和向外扩展;所谓向上扩展就是给服务器加更大的磁盘,使用更大更好的内存,更换更好的cpu;这种扩展在一定程度上是可以解决性能瓶颈问题,但随着数据量大增大,瓶颈会再次出现;所以通常这种向上扩展的方式不推荐;向外扩展是指一台服务器不够加两台,两台不够加三台,以这种方式扩展,只要出现瓶颈我们就可以使用增加服务器来解决;这样一来服务器性能解决了,但用户的读写怎么分散到多个服务器上去呢?所以我们还要想办法把数据切分成多块,让每个服务器只保存整个数据集的部分数据,这样一来使得原来一个很大的数据集就通过切片的方式,把它切分成多分,分散的存放在多个服务器上,这就是分片;分片是可以有效解决用户写操作性能瓶颈;虽然解决了服务器性能问题和用户写性能问题,同时也带来了一个新问题,就是用户的查询;我们把整个数据集分散到多个server上,那么用户怎么查询数据呢?比如用户要查询年龄大于30的用户,该怎么查询呢?而年龄大于30的用户的数据,可能server1上有一部分数据,server2上有部分数据,我们怎么才能够把所有满足条件的数据全部查询到呢?这个场景有点类似我们之前说的mogilefs的架构,用户上传图片到mogilefs首先要把图片的元数据写进tracker,然后在把数据存放在对应的data节点,这样一来用户来查询,首先找tracker节点,tracker会把用户的请求文件的元数据告诉客户端,然后客户端在到对应的data节点取数据,最后拼凑成一张图片;而在mongodb上也是很类似,不同的的是在mogilefs上,客户端需要自己去和后端的data节点交互,取出数据;在monGDB上客户端不需要直接和后端的data节点交互,而是通过mongodb专有的客户端代理去代客户端交互,最后把数据统一由代理返回给客户端;这样一来就可以解决用户的查询问题;简单讲所谓分片就是把一个大的数据集通过切分的方式切分成多分,分散的存放在多个服务器上;分片的目的是为了解决数据量过大而导致的性能问题;
2、数据集分片示意图
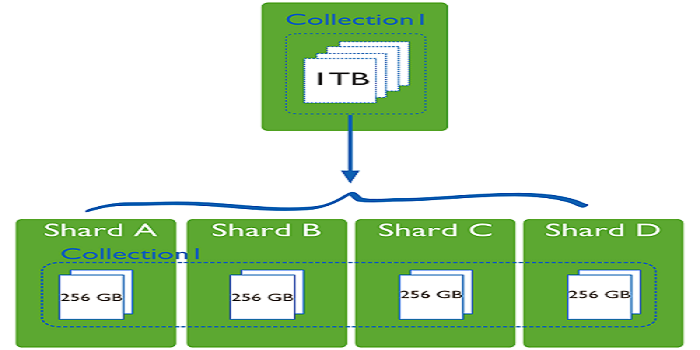
提示:我们通过分片,可以将原本1T的数据集,平均分成4分,每个节点存储原有数据集的1/4,使得原来用一台服务器处理1T的数据,现在可以用4台服务器来处理,这样一来就有效的提高了数据处理过程;这也是分布式系统的意义;在mongodb中我们把这种共同处理一个数据集的部分数据的节点叫shard,我们把使用这种分片机制的mongodb集群就叫做mongodb分片集群;
3、mongodb分片集群架构

提示:在mongodb分片集群中,通常有三类角色,第一类是router角色,router角色主要用来接收客户端的读写请求,主要运行mongos这个服务;为了使得router角色的高可用,通常会用多个节点来组成router高可用集群;第二类是config server,这类角色主要用来保存mongodb分片集群中的数据和集群的元数据信息,有点类似mogilefs中的tracker的作用;为了保证config server的高可用性,通常config server也会将其运行为一个副本集;第三类是shard角色,这类角色主要用来存放数据,类似mogilefs的数据节点,为了保证数据的高可用和完整性,通常每个shard是一个副本集;
4、mongodb分片集群工作过程
首先用户将请求发送给router,router接收到用户请求,然后去找config server拿对应请求的元数据信息,router拿到元数据信息后,然后再向对应的shard请求数据,最后将数据整合后响应给用户;在这个过程中router 就相当于mongodb的一个客户端代理;而config server用来存放数据的元数据信息,这些信息主要包含了那些shard上存放了那些数据,对应的那些数据存放在那些shard上,和mogilefs上的tracker非常类似,主要存放了两张表,一个是以数据为中心的一张表,一个是以shard节点为中心的一张表;
5、mongodb是怎么分片的?
在mongodb的分片集群中,分片是按照collection字段来分的,我们把指定的字段叫shard key;根据shard key的取值不同和应用场景,我们可以基于shard key取值范围来分片,也可以基于shard key做hash分片;分好片以后将结果保存在config server上;在configserver 上保存了每一个分片对应的数据集;比如我们基于shardkey的范围来分片,在configserver上就记录了一个连续范围的shardkey的值都保存在一个分片上;如下图
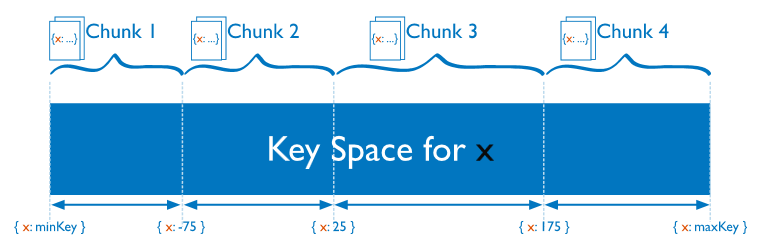
上图主要描述了基于范围的分片,从shardkey最小值到最大值进行分片,把最小值到-75这个范围值的数据块保存在第一个分片上,把-75到25这个范围值的数据块保存在第二个分片上,依次类推;这种基于范围的分片,很容易导致某个分片上的数据过大,而有的分片上的数据又很小,造成分片数据不均匀;所以除了基与shard key的值的范围分片,也可以基于shard key的值做hash分片,如下图

基于hash分片,主要是对shardkey做hash计算后,然后根据最后的结果落在哪个分片上就把对应的数据块保存在对应的分片上;比如我们把shandkey做hash计算,然后对分片数量进行取模计算,如果得到的结果是0,那么就把对应的数据块保存在第一个分片上,如果取得到结果是1就保存在第二个分片上依次类推;这种基于hash分片,就有效的降低分片数据不均衡的情况,因为hash计算的值是散列的;
除了上述两种切片的方式以外,我们还可以根据区域切片,也叫基于列表切片,如下图
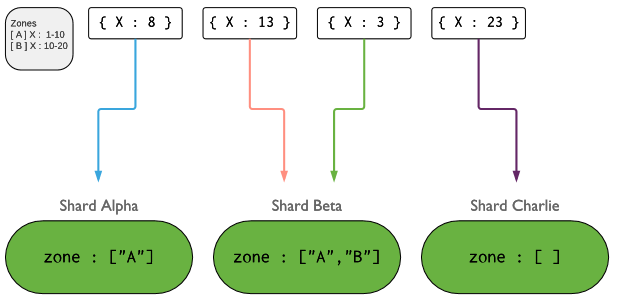
上图主要描述了基于区域分片,这种分片一般是针对shardkey的取值范围不是一个顺序的集合,而是一个离散的集合,比如我们可用这种方式对全国省份这个字段做切片,把流量特别大的省份单独切一个片,把流量小的几个省份组合切分一片,把国外的访问或不是国内省份的切分为一片;这种切片有点类似给shardkey做分类;不管用什么方式去做分片,我们尽可能的遵循写操作要越分散越好,读操作要越集中越好;
6、mongodb分片集群搭建
环境说明
| 主机名 | 角色 | ip地址 |
| node01 | router | 192.168.0.41 |
| node02/node03/node04 | config server replication set |
192.168.0.42 192.168.0.43 192.168.0.44 |
| node05/node06/node07 | shard1 replication set |
192.168.0.45 192.168.0.46 192.168.0.47 |
| node08/node09/node10 | shard2 replication set |
192.168.0.48 192.168.0.49 192.168.0.50 |
基础环境,各server做时间同步,关闭防火墙,关闭selinux,ssh互信,主机名解析
主机名解析
准备好基础环境以后,配置mongodb yum源
[root@node01 ~]# cat /etc/yum.repos.d/mongodb.repo
[mongodb-org]
name = MongoDB ReposITory
baseurl = https://mirrors.aliyun.COM/mongodb/yum/redhat/7/mongodb-org/4.4/x86_64/
gpgcheck = 1
enabled = 1
gpgkey = https://www.mongodb.org/static/pgp/server-4.4.asc
[root@node01 ~]#
将mongodb yum源复制给其他节点
[root@node01 ~]# for i in {02..10} ; do scp /etc/yum.repos.d/mongodb.repo node$i:/etc/yum.repos.d/; done
mongodb.repo                 100% 206 247.2KB/s 00:00
mongodb.repo                 100% 206 222.3KB/s 00:00
mongodb.repo                 100% 206 118.7KB/s 00:00
mongodb.repo                 100% 206 164.0KB/s 00:00
mongodb.repo                 100% 206 145.2KB/s 00:00
mongodb.repo                 100% 206 119.9KB/s 00:00
mongodb.repo                 100% 206 219.2KB/s 00:00
mongodb.repo                 100% 206 302.1KB/s 00:00
mongodb.repo                 100% 206 289.3KB/s 00:00
[root@node01 ~]#
在每个节点上安装mongodb-org这个包
for i in {01..10} ;
 do ssh node$i ' yum -y install mongodb-org ';
done
在config server 和shard节点上创建数据目录和日志目录,并将其属主和属组更改为mongod
[root@node01 ~]# for i in {02..10} ; do ssh node$i 'mkdir -p /mongodb/{data,LOG} && chown -R mongod.mongod /mongodb/ && ls -ld /mongodb'; done
drwxr-xr-x 4 mongod mongod 29 Nov 11 22:47 /mongodb
drwxr-xr-x 4 mongod mongod 29 Nov 11 22:45 /mongodb
drwxr-xr-x 4 mongod mongod 29 Nov 11 22:45 /mongodb
drwxr-xr-x 4 mongod mongod 29 Nov 11 22:45 /mongodb
drwxr-xr-x 4 mongod mongod 29 Nov 11 22:45 /mongodb
drwxr-xr-x 4 mongod mongod 29 Nov 11 22:45 /mongodb
drwxr-xr-x 4 mongod mongod 29 Nov 11 22:45 /mongodb
drwxr-xr-x 4 mongod mongod 29 Nov 11 22:45 /mongodb
drwxr-xr-x 4 mongod mongod 29 Nov 11 22:45 /mongodb
[root@node01 ~]#
配置shard1 replication set
[root@node05 ~]# cat /etc/mongod.conf
SysteMLog:
 destination: file
 logApPEnd: true
 path: /mongodb/log/mongod.log

storage:
 dbPath: /mongodb/data/
 journal:
 enabled: true

PRocessManagement:
 fork: true
 piDFilePath: /VAR/run/mongodb/mongod.pid
 timeZoneinfo: /usr/share/zoneinfo

net:
 bindIp: 0.0.0.0

sharding:
 clusterRole: shardsvr

replication:
 replSetName: shard1_replset
[root@node05 ~]# scp /etc/mongod.conf node06:/etc/
mongod.conf                 100% 360 394.5KB/s 00:00
[root@node05 ~]# scp /etc/mongod.conf node07:/etc/
mongod.conf                 100% 360 351.7KB/s 00:00
[root@node05 ~]#
配置shard2 replication set
[root@node08 ~]# cat /etc/mongod.conf
systemLog:
 destination: file
 logAppend: true
 path: /mongodb/log/mongod.log

storage:
 dbPath: /mongodb/data/
 journal:
 enabled: true

processManagement:
 fork: true
 pidFilePath: /var/run/mongodb/mongod.pid
 timeZoneInfo: /usr/share/zoneinfo

net:
 bindIp: 0.0.0.0

sharding:
 clusterRole: shardsvr

replication:
 replSetName: shard2_replset
[root@node08 ~]# scp /etc/mongod.conf node09:/etc/
mongod.conf                 100% 360 330.9KB/s 00:00
[root@node08 ~]# scp /etc/mongod.conf node10:/etc/
mongod.conf                 100% 360 385.9KB/s 00:00
[root@node08 ~]#
启动shard1 replication set和shard2 replication set
[root@node05 ~]# systemctl start mongod.service
[root@node05 ~]# ss -tnl
State  recv-Q Send-Q   Local Address:Port       Peer Address:Port
LISTEN  0  128       *:22          *:*
LISTEN  0  100     127.0.0.1:25          *:*
LISTEN  0  128       *:27018         *:*
LISTEN  0  128       :::22          :::*
LISTEN  0  100      ::1:25          :::*
[root@node05 ~]#for i in {06..10} ; do ssh node$i 'systemctl start mongod.service && ss -tnl';done
State  Recv-Q Send-Q Local Address:Port    Peer Address:Port
LISTEN  0  128   *:22      *:*
LISTEN  0  100 127.0.0.1:25      *:*
LISTEN  0  128   *:27018     *:*
LISTEN  0  128   :::22      :::*
LISTEN  0  100  ::1:25      :::*
State  Recv-Q Send-Q Local Address:Port    Peer Address:Port
LISTEN  0  128   *:22      *:*
LISTEN  0  100 127.0.0.1:25      *:*
LISTEN  0  128   *:27018     *:*
LISTEN  0  128   :::22      :::*
LISTEN  0  100  ::1:25      :::*
State  Recv-Q Send-Q Local Address:Port    Peer Address:Port
LISTEN  0  128   *:22      *:*
LISTEN  0  100 127.0.0.1:25      *:*
LISTEN  0  128   *:27018     *:*
LISTEN  0  128   :::22      :::*
LISTEN  0  100  ::1:25      :::*
State  Recv-Q Send-Q Local Address:Port    Peer Address:Port
LISTEN  0  128   *:22      *:*
LISTEN  0  100 127.0.0.1:25      *:*
LISTEN  0  128   *:27018     *:*
LISTEN  0  128   :::22      :::*
LISTEN  0  100  ::1:25      :::*
State  Recv-Q Send-Q Local Address:Port    Peer Address:Port
LISTEN  0  128   *:22      *:*
LISTEN  0  100 127.0.0.1:25      *:*
LISTEN  0  128   *:27018     *:*
LISTEN  0  128   :::22      :::*
LISTEN  0  100  ::1:25      :::*
[root@node05 ~]#
提示:默认不指定shard监听端口,它默认就监听在27018端口,所以启动shard节点后,请确保27018端口正常监听即可;
连接node05的mongodb 初始化shard1_replset副本集
> rs.initiate(
... {
...  _id : "shard1_replset",
...  members: [
...  { _id : 0, host : "node05:27018" },
...  { _id : 1, host : "node06:27018" },
...  { _id : 2, host : "node07:27018" }
...  ]
... }
... )
{
  "ok" : 1,
  "$clusterTime" : {
    "clusterTime" : Timestamp(1605107401, 1),
    "signature" : {
      "hash" : BinData(0,"AAAAAAAAAAAAAAAAAAAAAAAAAAA="),
      "keyId" : NumberLong(0)
    }
  },
  "operationTime" : Timestamp(1605107401, 1)
}
shard1_replset:SECONDARY>
连接node08的mongodb 初始化shard2_replset副本集
> rs.initiate(
... {
...  _id : "shard2_replset",
...  members: [
...  { _id : 0, host : "node08:27018" },
...  { _id : 1, host : "node09:27018" },
...  { _id : 2, host : "node10:27018" }
...  ]
... }
... )
{
  "ok" : 1,
  "$clusterTime" : {
    "clusterTime" : Timestamp(1605107644, 1),
    "signature" : {
      "hash" : BinData(0,"AAAAAAAAAAAAAAAAAAAAAAAAAAA="),
      "keyId" : NumberLong(0)
    }
  },
  "operationTime" : Timestamp(1605107644, 1)
}
shard2_replset:OTHER>
配置configserver replication set
[root@node02 ~]# cat /etc/mongod.conf
systemLog:
 destination: file
 logAppend: true
 path: /mongodb/log/mongod.log

storage:
 dbPath: /mongodb/data/
 journal:
 enabled: true

processManagement:
 fork: true
 pidFilePath: /var/run/mongodb/mongod.pid
 timeZoneInfo: /usr/share/zoneinfo

net:
 bindIp: 0.0.0.0

sharding:
 clusterRole: configsvr

replication:
 replSetName: CFg_replset
[root@node02 ~]# scp /etc/mongod.conf node03:/etc/mongod.conf
mongod.conf                 100% 358 398.9KB/s 00:00
[root@node02 ~]# scp /etc/mongod.conf node04:/etc/mongod.conf
mongod.conf                 100% 358 270.7KB/s 00:00
[root@node02 ~]#
启动config server
[root@node02 ~]# systemctl start mongod.service
[root@node02 ~]# ss -tnl
State  Recv-Q Send-Q   Local Address:Port       Peer Address:Port
LISTEN  0  128       *:27019         *:*
LISTEN  0  128       *:22          *:*
LISTEN  0  100     127.0.0.1:25          *:*
LISTEN  0  128       :::22          :::*
LISTEN  0  100      ::1:25          :::*
[root@node02 ~]# ssh node03 'systemctl start mongod.service && ss -tnl'
State  Recv-Q Send-Q Local Address:Port    Peer Address:Port
LISTEN  0  128   *:27019     *:*
LISTEN  0  128   *:22      *:*
LISTEN  0  100 127.0.0.1:25      *:*
LISTEN  0  128   :::22      :::*
LISTEN  0  100  ::1:25      :::*
[root@node02 ~]# ssh node04 'systemctl start mongod.service && ss -tnl'
State  Recv-Q Send-Q Local Address:Port    Peer Address:Port
LISTEN  0  128   *:27019     *:*
LISTEN  0  128   *:22      *:*
LISTEN  0  100 127.0.0.1:25      *:*
LISTEN  0  128   :::22      :::*
LISTEN  0  100  ::1:25      :::*
[root@node02 ~]#
提示:config server 默认在不指定端口的情况监听在27019这个端口,启动后,请确保该端口处于正常监听;
连接node02的mongodb,初始化cfg_replset 副本集
> rs.initiate(
... {
...  _id: "cfg_replset",
...  configsvr: true,
...  members: [
...  { _id : 0, host : "node02:27019" },
...  { _id : 1, host : "node03:27019" },
...  { _id : 2, host : "node04:27019" }
...  ]
... }
... )
{
  "ok" : 1,
  "$gleStats" : {
    "lastOpTime" : Timestamp(1605108177, 1),
    "electionId" : ObjectId("000000000000000000000000")
  },
  "lastCommittedOpTime" : Timestamp(0, 0),
  "$clusterTime" : {
    "clusterTime" : Timestamp(1605108177, 1),
    "signature" : {
      "hash" : BinData(0,"AAAAAAAAAAAAAAAAAAAAAAAAAAA="),
      "keyId" : NumberLong(0)
    }
  },
  "operationTime" : Timestamp(1605108177, 1)
}
cfg_replset:SECONDARY>
配置router
[root@node01 ~]# cat /etc/mongos.conf
systemLog:
 destination: file
 path: /var/log/mongodb/mongos.log
 logAppend: true

processManagement:
 fork: true

net:
 bindIp: 0.0.0.0
sharding:
 configDB: "cfg_replset/node02:27019,node03:27019,node04:27019"
[root@node01 ~]#
提示:configDB必须是副本集名称/成员监听地址:port的形式,成员至少要写一个;
启动router
[root@node01 ~]# mongos -f /etc/mongos.conf
about to fork child process, waiting until server is ready for connections.
forked process: 1510
child process started successfully, parent exiting
[root@node01 ~]# ss -tnl
State  Recv-Q Send-Q   Local Address:Port       Peer Address:Port
LISTEN  0  128       *:22          *:*
LISTEN  0  100     127.0.0.1:25          *:*
LISTEN  0  128       *:27017         *:*
LISTEN  0  128       :::22          :::*
LISTEN  0  100      ::1:25          :::*
[root@node01 ~]#
连接mongos,添加shard1 replication set 和shard2 replication set
mongos> sh.addShard("shard1_replset/node05:27018,node06:27018,node07:27018")
{
  "shardAdded" : "shard1_replset",
  "ok" : 1,
  "operationTime" : Timestamp(1605109085, 3),
  "$clusterTime" : {
    "clusterTime" : Timestamp(1605109086, 1),
    "signature" : {
      "hash" : BinData(0,"AAAAAAAAAAAAAAAAAAAAAAAAAAA="),
      "keyId" : NumberLong(0)
    }
  }
}
mongos> sh.addShard("shard2_replset/node08:27018,node09:27018,node10:27018")
{
  "shardAdded" : "shard2_replset",
  "ok" : 1,
  "operationTime" : Timestamp(1605109118, 2),
  "$clusterTime" : {
    "clusterTime" : Timestamp(1605109118, 3),
    "signature" : {
      "hash" : BinData(0,"AAAAAAAAAAAAAAAAAAAAAAAAAAA="),
      "keyId" : NumberLong(0)
    }
  }
}
mongos>
提示:添加shard 副本集也是需要指明副本集名称/成员的格式添加;
到此分片集群就配置好了
查看sharding 集群状态
mongos> sh.status()
--- Sharding Status ---
 sharding version: {
  "_id" : 1,
  "minCompatibleVersion" : 5,
  "currentVersion" : 6,
  "clusterId" : ObjectId("5fac01dd8d6fa3fe899662c8")
 }
 shards:
  { "_id" : "shard1_replset", "host" : "shard1_replset/node05:27018,node06:27018,node07:27018", "state" : 1 }
  { "_id" : "shard2_replset", "host" : "shard2_replset/node08:27018,node09:27018,node10:27018", "state" : 1 }
 active mongoses:
  "4.4.1" : 1
 autosplit:
  Currently enabled: yes
 balancer:
  Currently enabled: yes
  Currently running: yes
  Collections with active migrations:
    config.system.sessions started at Wed Nov 11 2020 23:43:14 GMT+0800 (CST)
  Failed balancer rounds in last 5 attempts: 0
  Migration Results for the last 24 hours:
    45 : Success
 databases:
  { "_id" : "config", "Primary" : "config", "partitioned" : true }
    config.system.sessions
      shard key: { "_id" : 1 }
      unique: false
      balancing: true
      chunks:
        shard1_replset 978
        shard2_replset 46
      too many chunks to print, use verbose if you want to force print
mongos>
提示:可以看到当前分片集群中有两个shard 副本集,分别是shard1_replset和shard2_replset;以及一个config server
对testdb数据库启用sharding功能
mongos> sh.enableSharding("testdb")
{
  "ok" : 1,
  "operationTime" : Timestamp(1605109993, 9),
  "$clusterTime" : {
    "clusterTime" : Timestamp(1605109993, 9),
    "signature" : {
      "hash" : BinData(0,"AAAAAAAAAAAAAAAAAAAAAAAAAAA="),
      "keyId" : NumberLong(0)
    }
  }
}
mongos> sh.status()
--- Sharding Status ---
 sharding version: {
  "_id" : 1,
  "minCompatibleVersion" : 5,
  "currentVersion" : 6,
  "clusterId" : ObjectId("5fac01dd8d6fa3fe899662c8")
 }
 shards:
  { "_id" : "shard1_replset", "host" : "shard1_replset/node05:27018,node06:27018,node07:27018", "state" : 1 }
  { "_id" : "shard2_replset", "host" : "shard2_replset/node08:27018,node09:27018,node10:27018", "state" : 1 }
 active mongoses:
  "4.4.1" : 1
 autosplit:
  Currently enabled: yes
 balancer:
  Currently enabled: yes
  Currently running: no
  Failed balancer rounds in last 5 attempts: 0
  Migration Results for the last 24 hours:
    214 : Success
 databases:
  { "_id" : "config", "primary" : "config", "partitioned" : true }
    config.system.sessions
      shard key: { "_id" : 1 }
      unique: false
      balancing: true
      chunks:
        shard1_replset 810
        shard2_replset 214
      too many chunks to print, use verbose if you want to force print
  { "_id" : "testdb", "primary" : "shard2_replset", "partitioned" : true, "version" : { "uuid" : UUID("454aad2e-b397-4c88-b5c4-c3b21d37e480"), "lastMod" : 1 } }
mongos>
提示:在对某个数据库启动sharding功能后,它会给我们分片一个主shard所谓主shard是用来存放该数据库下没有做分片的colleciton;对于分片的collection会分散在各个shard上;
启用对testdb库下的peoples集合启动sharding,并指明在age字段上做基于范围的分片
mongos> sh.shardCollection("testdb.peoples",{"age":1})
{
  "collectionsharded" : "testdb.peoples",
  "collectionUUID" : UUID("ec095411-240d-4484-b45d-b541c33c3975"),
  "ok" : 1,
  "operationTime" : Timestamp(1605110694, 11),
  "$clusterTime" : {
    "clusterTime" : Timestamp(1605110694, 11),
    "signature" : {
      "hash" : BinData(0,"AAAAAAAAAAAAAAAAAAAAAAAAAAA="),
      "keyId" : NumberLong(0)
    }
  }
}
mongos> sh.status()
--- Sharding Status ---
 sharding version: {
  "_id" : 1,
  "minCompatibleVersion" : 5,
  "currentVersion" : 6,
  "clusterId" : ObjectId("5fac01dd8d6fa3fe899662c8")
 }
 shards:
  { "_id" : "shard1_replset", "host" : "shard1_replset/node05:27018,node06:27018,node07:27018", "state" : 1 }
  { "_id" : "shard2_replset", "host" : "shard2_replset/node08:27018,node09:27018,node10:27018", "state" : 1 }
 active mongoses:
  "4.4.1" : 1
 autosplit:
  Currently enabled: yes
 balancer:
  Currently enabled: yes
  Currently running: no
  Failed balancer rounds in last 5 attempts: 0
  Migration Results for the last 24 hours:
    408 : Success
 databases:
  { "_id" : "config", "primary" : "config", "partitioned" : true }
    config.system.sessions
      shard key: { "_id" : 1 }
      unique: false
      balancing: true
      chunks:
        shard1_replset 616
        shard2_replset 408
      too many chunks to print, use verbose if you want to force print
  { "_id" : "testdb", "primary" : "shard2_replset", "partitioned" : true, "version" : { "uuid" : UUID("454aad2e-b397-4c88-b5c4-c3b21d37e480"), "lastMod" : 1 } }
    testdb.peoples
      shard key: { "age" : 1 }
      unique: false
      balancing: true
      chunks:
        shard2_replset 1
      { "age" : { "$minKey" : 1 } } -->> { "age" : { "$maxKey" : 1 } } on : shard2_replset Timestamp(1, 0)
mongos>
提示:如果对应的collection存在,我们还需要先对collection创建shardkey索引,然后在使用sh.shardCollection()来对colleciton启用sharding功能;基于范围做分片,我们可以在多个字段上做;
基于hash做分片
mongos> sh.shardCollection("testdb.peoples1",{"name":"hashed"})
{
  "collectionsharded" : "testdb.peoples1",
  "collectionUUID" : UUID("f6213da1-7c7d-4d5e-8fb1-fc554efb9df2"),
  "ok" : 1,
  "operationTime" : Timestamp(1605111014, 2),
  "$clusterTime" : {
    "clusterTime" : Timestamp(1605111014, 2),
    "signature" : {
      "hash" : BinData(0,"AAAAAAAAAAAAAAAAAAAAAAAAAAA="),
      "keyId" : NumberLong(0)
    }
  }
}
mongos> sh.status()
--- Sharding Status ---
 sharding version: {
  "_id" : 1,
  "minCompatibleVersion" : 5,
  "currentVersion" : 6,
  "clusterId" : ObjectId("5fac01dd8d6fa3fe899662c8")
 }
 shards:
  { "_id" : "shard1_replset", "host" : "shard1_replset/node05:27018,node06:27018,node07:27018", "state" : 1 }
  { "_id" : "shard2_replset", "host" : "shard2_replset/node08:27018,node09:27018,node10:27018", "state" : 1 }
 active mongoses:
  "4.4.1" : 1
 autosplit:
  Currently enabled: yes
 balancer:
  Currently enabled: yes
  Currently running: yes
  Collections with active migrations:
    config.system.sessions started at Thu Nov 12 2020 00:10:16 GMT+0800 (CST)
  Failed balancer rounds in last 5 attempts: 0
  Migration Results for the last 24 hours:
    480 : Success
 databases:
  { "_id" : "config", "primary" : "config", "partitioned" : true }
    config.system.sessions
      shard key: { "_id" : 1 }
      unique: false
      balancing: true
      chunks:
        shard1_replset 543
        shard2_replset 481
      too many chunks to print, use verbose if you want to force print
  { "_id" : "testdb", "primary" : "shard2_replset", "partitioned" : true, "version" : { "uuid" : UUID("454aad2e-b397-4c88-b5c4-c3b21d37e480"), "lastMod" : 1 } }
    testdb.peoples
      shard key: { "age" : 1 }
      unique: false
      balancing: true
      chunks:
        shard2_replset 1
      { "age" : { "$minKey" : 1 } } -->> { "age" : { "$maxKey" : 1 } } on : shard2_replset Timestamp(1, 0)
    testdb.peoples1
      shard key: { "name" : "hashed" }
      unique: false
      balancing: true
      chunks:
        shard1_replset 2
        shard2_replset 2
      { "name" : { "$minKey" : 1 } } -->> { "name" : NumberLong("-4611686018427387902") } on : shard1_replset Timestamp(1, 0)
      { "name" : NumberLong("-4611686018427387902") } -->> { "name" : NumberLong(0) } on : shard1_replset Timestamp(1, 1)
      { "name" : NumberLong(0) } -->> { "name" : NumberLong("4611686018427387902") } on : shard2_replset Timestamp(1, 2)
      { "name" : NumberLong("4611686018427387902") } -->> { "name" : { "$maxKey" : 1 } } on : shard2_replset Timestamp(1, 3)
mongos>
提示:基于hash做分片只能在一个字段上做,不能指定多个字段;从上面的状态信息可以看到testdb.peoples被分到了shard2上,peoples1一部分分到了shard1,一部分分到了shard2上;所以在Peoples中插入多少条数据,它都会写到shard2上,在peoples1中插入数据会被写入到shard1和shard2上;
验证:在peoples1 集合上插入数据,看看是否将数据分片到不同的shard上呢?
在mongos上插入数据
mongos> use testdb
switched to db testdb
mongos> for (i=1;i<=10000;i++) db.peoples1.insert({name:"people"+i,age:(i%120),classes:(i%20)})
WriteResult({ "nInserted" : 1 })
mongos>
在shard1上查看数据
shard1_replset:PRIMARY> show dbs
admin 0.000GB
config 0.001GB
local 0.001GB
testdb 0.000GB
shard1_replset:PRIMARY> use testdb
switched to db testdb
shard1_replset:PRIMARY> show tables
peoples1
shard1_replset:PRIMARY> db.peoples1.find().count()
4966
shard1_replset:PRIMARY>
提示:在shard1上可以看到对应collection保存了4966条数据;
在shard2上查看数据
shard2_replset:PRIMARY> show dbs
admin 0.000GB
config 0.001GB
local 0.011GB
testdb 0.011GB
shard2_replset:PRIMARY> use testdb
switched to db testdb
shard2_replset:PRIMARY> show tables
peoples
peoples1
shard2_replset:PRIMARY> db.peoples1.find().count()
5034
shard2_replset:PRIMARY>
提示:在shard2上可以看到有peoples集合和peoples1集合,其中peoples1集合保存了5034条数据;shard1和shard2总共就保存了我们刚才插入的10000条数据;
ok,到此mongodb的分片集群就搭建,测试完毕了;
到此这篇关于分布式文档存储数据库之MongoDB分片集群的文章就介绍到这了,更多相关MongoDB分片集群内容请搜索脚本宝典以前的文章或继续浏览下面的相关文章希望大家以后多多支持脚本宝典!
脚本宝典总结
以上是脚本宝典为你收集整理的分布式文档存储数据库之MongoDB分片集群的问题全部内容,希望文章能够帮你解决分布式文档存储数据库之MongoDB分片集群的问题所遇到的问题。
本图文内容来源于网友网络收集整理提供,作为学习参考使用,版权属于原作者。
如您有任何意见或建议可联系处理。小编QQ:384754419,请注明来意。
- MySQL和MongoDB设计实例对比分析 2022-04-21
- 关于CentOS 8 搭建MongoDB4.4分片集群的问题 2022-04-21
- centos8安装MongoDB的详细过程 2022-04-21
- MongoDB中优雅删除大量数据的三种方式 2022-04-21
- springboot + mongodb 通过经纬度坐标匹配平面区域的方法 2022-04-21
- MongoDB连接数据库并创建数据等使用方法 2022-04-21
- Ubuntu环境下mongodb安装配置详细步骤 2022-04-21
- mongodb出现id重复问题的简单解决办法 2022-04-21
- MongoDB数据库安装部署及警告优化 2022-04-21
- MongoDB数据库授权认证的实现 2022-04-21