python总结之闭包和装饰器
脚本宝典收集整理的这篇文章主要介绍了python总结之闭包和装饰器,脚本宝典觉得挺不错的,现在分享给大家,也给大家做个参考。
一、装饰器
1. 装饰器的简单介绍
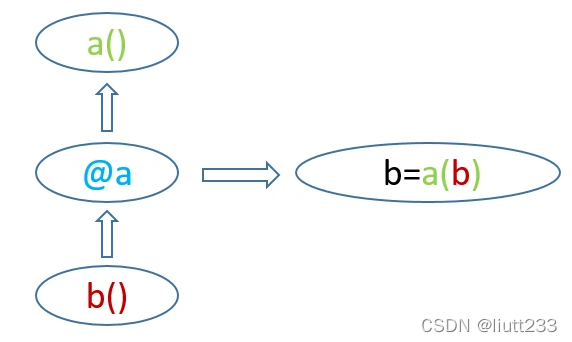
“装饰器的功能是将被装饰的函数当作参数传递给与装饰器对应的函数(名称相同的函数),并返回包装后的被装饰的函数”,听起来有点绕,没关系,直接看示意图,其中 a 为与装饰器 @a 对应的函数, b 为装饰器修饰的函数,装饰器@a的作用是:
举个栗子:
上面使用@test来表示装饰器,其等同于:afunc = test(afunc),因此装饰器本质上就是个语法糖,其作用为简化代码,以提高代码可读性。
2. 装饰器的解析过程
step1. python 解释器发现@test,就去调用与其对应的test函数
step2. test函数调用前要指定一个参数,传入的就是@test下面修饰的函数,也就是afunc()
steP3. test() 函数执行,调用 afunc(),afunc() 打印“hello”
二、闭包
在计算机科学中,闭包(Closure)是词法闭包(Lexical Closure)的简称,是引用了自由变量的函数。这个被引用的自由变量将和这个函数一同存在,即使已经离开了创造它的环境也不例外。所以,有另一种说法认为闭包是由函数和与其相关的引用环境组合而成的实体。闭包在运行时可以有多个实例,不同的引用环境和相同的函数组合可以产生不同的实例。
闭包并不是Python中特有的概念,所有把函数做为一等公民的语言均有闭包的概念。不过像Java这样以class为一等公民的语言中也可以使用闭包,只是它得用类或接口来实现。
通过Python的语言介绍,一个闭包就是你调用了一个函数A,这个函数A返回了一个函数B给你。这个返回的函数B就叫做闭包。你在调用函数A的时候传递的参数就是自由变量。
举个栗子:
def func(name):
    def inner_func(age):
        print 'name:', name, 'age:', age
    return inner_func

bb = func('the5fire')
bb(26)  # >>> name: the5fire age: 26
这里面调用func的时候就产生了一个闭包——inner_func,并且该闭包持有自由变量——name,因此这也意味着,当函数func的生命周期结束之后,name这个变量依然存在,因为它被闭包引用了,所以不会被回收。
三、闭包中nonlocal语句的使用
1. 外部变量的引用和改写
在 python 的函数内,可以直接引用外部变量,但不能改写外部变量。
例如在下面的栗子,
counter中可以正常打印常量count,但无法改变count;对list可以执行apPEnd操作,正常修改。
def cnt(param):
    count = 0
    alist = []
    def counter():
        alist.append(1)
        # count += 1 # UnboundLocalError: local VARiable 'count' referenced before assignment
        print(param, str(count), alist)
    return counter

test = cnt("test")
test()
# test 0 [1]
2. nolocal的使用及特点
python 2 中可以在函数内使用 global 语句,但全局变量在任何语言中都不被提倡,因为它很难控制。python 3 中引入了 nonlocal 语句解决了这个问题。
Nonlocal 与 global 的区别在于:nonlocal 语句会去搜寻本地变量与全局变量之间的变量,其会优先寻找层级关系与闭包作用域最近的外部变量。
def cnt(param):
    count = 0
    def counter():
        nonlocal count
        count += 1
        print(param, str(count))
    return counter

test = cnt("test")
test()

# test 1
四、闭包与装饰器
上面已经简单演示了装饰器的功能,事实上,装饰器就是一种的闭包的应用,只不过其传递的(自由变量)是函数:
使用装饰器的写法:
def make1(fn):
    def wrapped():
        return "<a>" + fn() + "</a>"
    return wrapped

def make2(fn):
    def wrapped():
        return "<b>" + fn() + "</b>"
    return wrapped

@make1
@make2
def hello():
    return "hello"

print(hello())
# <a><b>hello</b></a>
显式使用闭包的写法:
def make1(fn):
    def wrapped():
        return "<a>" + fn() + "</a>"
    return wrapped

def make2(fn):
    def wrapped():
        return "<b>" + fn() + "</b>"
    return wrapped

def hello():
    return "hello"

hello = make2(hello)
hello = make1(hello)
print(hello())
# <a><b>hello</b></a>
多个装饰器装饰一个函数时,执行时的顺序是:最先装饰的装饰器,最后一个执行。它遵循了先进后出规则 类似于stack。
五、闭包的作用
闭包的最大特点是可以将父函数的变量与内部函数绑定,并返回绑定变量后的函数(也即闭包),此时即便生成闭包的环境(父函数)已经释放,闭包仍然存在。
这个过程很像类(父函数)生成实例(闭包),不同的是父函数只在调用时执行,执行完毕后其环境就会释放,而类则在文件执行时创建,一般程序执行完毕后作用域才释放,因此对一些需要重用的功能且不足以定义为类的行为,使用闭包会比使用类占用更少的资源,且更轻巧灵活。
假设我们仅仅想打印出各类动物的叫声,分别以类和闭包来实现:

样的,但显然类的实现相对繁琐,且这里只是想输出一下动物的叫声,定义一个 Animal 类未免小题大做,而且 voice 函数在执行完毕后,其作用域就已经释放,但 Animal 类及其实例 dog 的相应属性却一直贮存在内存中。
除此之外,闭包还有很多其他功能,比如用于封装等,另外,闭包有效的减少了函数参数的数目,这对并行计算非常有价值,比如可以让每台电脑负责一个函数,然后串起来,实现流水化的作业等。
六、几个小栗子
栗子1:
def outer(f):
    def inner(*arg, **kargs):
        inner.co += 1
        return f(*arg, **kargs)
    inner.co = 0
    return inner

@outer
def cu():
    pass

if __name__ == '__main__':
    cu()
    cu()
    cu()
    print(cu.co)
# 3
栗子2:
下述样例中,注意点:
- 首先解析装饰器A,装饰器装饰了几个类就执行几次,输出两次“i赋值”
- B和C为两个对象,属性值单独累加。
def A(func):
    def inner():
        inner.i += 1
        print("i加1,i={0}".format(inner.i))
    inner.i = 0
    print("i赋值")
    return inner

@A
def B():
    pass

@A
def C():
    pass
B()
B()
B()
C()
C()
print(id(B), id(B.i))
print(id(C), id(C.i))
i赋值
i赋值
i加1,i=1
i加1,i=2
i加1,i=3
i加1,i=1
i加1,i=2
281473235252496 187650677653032
281473235252768 187650677653000
栗子3
- 装饰器是在python解释器加载test函数的时候就完成的,即使不调用test函数,也会输出"bbb"和"aaa",输出顺序为,dec_b装饰了test,执行输出bbb,dec_a装饰了dec_b,执行输出aaa;
- 执行test等同于执行dec_a(dec_b(test))
def dec_a(function): print("aaa") def inner_func(): print("before function") function() return inner_funcdef dec_b(function): print("bbb") def inner_func(): function() print("after function") return inner_func@dec_a@dec_bdef test(): print("test")test()
bbbaaabefore functiontestafter function
七、特殊的装饰器
property 装饰器
参考这篇文章:https://www.tianqiweiqi.COM/python-property.htML
property 是Python中很赞的概念,它使得面向对象的编程更加简单。
在Python中,property()是一个内置函数,用于创建和返回一个property对象。Property对象有三个方法,getter(), setter()和delete(),用来在对象创建后设置fget,fset和fdel。
装饰器(decorator)可以给函数动态加上功能,对于类的方法,装饰器一样起作用。Python内置的@property装饰器就是负责把一个方法变成属性调用的。属性是对事物某种特性的抽象,面向对象编程中一个重要概念;区别于字段,它通常表示为字段的扩展,加以访问与设置保护机制。
1. 我们为什么需要用到property
博文中假设了一种场景,假设我们有一个存储并转化温度的需求,可以通过类实现:
class Celsius:
    def __inIT__(self, temperature = 0):
        self.temperature = temperature
    def to_fahrenheit(self):
        return (self.temperature * 1.8) + 32
然后通过类实例进行温度的设定和获取,且可以看到这个属性已经被添加man.__dict__中了。
>>> man = Celsius()
>>> man.temperature = 37
>>> man.temperature
37
>>> man.to_fahrenheit()
98.60000000000001

>>> man.__dict__
{'temperature': 37}
但是此时如果我们需要对温度的设定进行一定的约束,此前的方案是没办法做到的。
2. 使用Getters和Setters
对于上边的约束,一个很容易想到的解决方案是隐藏其温度属性(使其私有化),并且定义新的用于操作温度属性的getter和setter接口。可以这么实现:
class Celsius:
    def __init__(self, temperature = 0):
        self.set_temperature(temperature)

    def to_fahrenheit(self):
        return (self.get_temperature() * 1.8) + 32

    def get_temperature(self):
        return self._temperature

    def set_temperature(self, value):
        if value < -273:
            raise ValueError("Temperature below -273 is not possible")
        self._temperature = value
上述方案虽然满足了基本需求,但是有个问题是,在赋值和调用时,需要修改调用方式,例如obj.temperature需改为obj.get_temperature(),obj.temperature = val改为obj.set_temperature(val)。
我们希望我们的更新是不向后兼容地。这就是需要property闪亮登场的地方。
3. property的作用
对于上边的问题,Python式的解决方式是使用property,在setter中进行参数校验:
class Celsius:
    def __init__(self, temperature = 0):
        self._temperature = temperature

    def to_fahrenheit(self):
        return (self.temperature * 1.8) + 32

    @property
    def temperature(self):
        print("Getting value")
        return self._temperature

    @temperature.setter
    def temperature(self, value):
        if value < -273:
            raise ValueError("Temperature below -273 is not possible")
        print("Setting value")
        self._temperature = value
在Python中,property()是一个内置函数,用于创建和返回一个property对象。该函数的签名为:
property(fget=None, fset=None, fdel=None, doc=None)
只定义getter方法,不定义setter方法就是一个只读属性;
否则为可读可写属性,且在setter中进行参数校验。
4. 小栗子
class Student():
    def __init__(self):
        self._score = 10000

    @property
    def score(self):
        return self._score

    @score.setter
    def score(self, value):
        if value < 0:
            print("wrong value")
            return
        self._score = value

    @score.deleter
    def score(self):
        del self._score


a = Student()
a.score = 99
print(a.score)

del a.score
a.score = -1
print(a.score)

# 99
# wrong value
# AttributeError: 'Student' object has no attribute '_score'
staticmethod装饰器和classmethod装饰器
python面向对象编程中,类中定义的方法:
- @classmethod 装饰的类方法:第一个参数必须是cls
- @staticmethod 装饰的静态方法:和普通的函数没有区别
- 不带装饰器的实例方法:第一个参数必须是 self
以一个简单的代码为例,执行方式如下:
class A(object):   # 创建一个类对象,初始化类属性和方法
    def m1(self, n):
        print("self:", self)

    @classmethod
    def m2(cls, n):
        print("cls:", cls)

    @staticmethod
    def m3(n):
        pass

a = A() # 调用类构造器,构造实例对象a
a.m1(1) # 内部把[实例对象a]传递给[self]进行绑定,self和a指向同一个实例对象。
A.m2(1) # 内部把[类对象A]传递给[cls],cls和A都指向类对象。
A.m3(1)
下面分别使用不同的类方法进行代码的测试:
step1:定义实例方法count()。
SPAM.numInstances为类调用,直接返回初始化的99;x.numInstances为实例化调用,在实例化时调用了init构造方法,调用了实例方法count,在99的基础上加1。
Sub.numInstances, Other.numInstances为类调用,直接返回初始化的1;y1.numInstances, z1.numInstances为实例化调用,由于sub和other子类继承了父类spam,且在内部没有定义init方法,因此返回父类的init,调用count,在初始化的基础上加1。
class Spam:
    numInstances = 99
    def count(self):
        self.numInstances += 1
    def __init__(self):
        self.count()

class Sub(Spam):
    numInstances = 0

class Other(Spam):
    numInstances = 0

x = Spam()
y1, y2 = Sub(), Sub()
z1, z2, z3 = Other(), Other(), Other()
print(x.numInstances, y1.numInstances, z1.numInstances)
print(Spam.numInstances, Sub.numInstances, Other.numInstances)
100 1 1
99 0 0
step2:定义静态方法count()。
每次实例化都会调用init方法,调用count对类属性Spam.numInstances的值进行累加,因此实例化几次,就会累加多少次。
class Spam:
    numInstances = 99
    @staticmethod
    def count():
        Spam.numInstances += 1
    def __init__(self):
        self.count()

class Sub(Spam):
    numInstances = 0

class Other(Spam):
    numInstances = 0

x = Spam()
y1, y2 = Sub(), Sub()
z1, z2, z3 = Other(), Other(), Other()
print(x.numInstances, y1.numInstances, z1.numInstances)
print(Spam.numInstances, Sub.numInstances, Other.numInstances)
105 0 0
105 0 0
step3:定义类方法count()。
在实例化Sub和Other子类时,子类内部定义了numInstances,因此会在cls.numInstances += 1时,分别在Sub和Other各自的numInstances 分别进行累加,实例化多少次,进行多少次累加。
class Spam:
    numInstances = 99
    @classmethod
    def count(cls):
        cls.numInstances += 1
    def __init__(self):
        self.count()

class Sub(Spam):
    numInstances = 0

class Other(Spam):
    numInstances = 0

x = Spam()
y1, y2 = Sub(), Sub()
z1, z2, z3 = Other(), Other(), Other()
print(x.numInstances, y1.numInstances, z1.numInstances)
print(Spam.numInstances, Sub.numInstances, Other.numInstances)
100 2 3
100 2 3
总结
本篇文章就到这里了,希望能够给你带来帮助,也希望您能够多多关注脚本宝典的更多内容!
脚本宝典总结
以上是脚本宝典为你收集整理的python总结之闭包和装饰器全部内容,希望文章能够帮你解决python总结之闭包和装饰器所遇到的问题。
本图文内容来源于网友网络收集整理提供,作为学习参考使用,版权属于原作者。
如您有任何意见或建议可联系处理。小编QQ:384754419,请注明来意。
- python怎么读excel 2022-05-15
- Python Pygame实战之打地鼠小游戏 2022-04-17
- Django admin实现TextField字段changelist页面换行、空格正常显示 2022-04-17
- 基于Python实现的恋爱对话小程序详解 2022-04-17
- 分享6 个值得收藏的 Python 代码 2022-04-17
- python+appium实现自动化测试的示例代码 2022-04-17
- Python实现带GUI界面的手写数字识别 2022-04-17
- Python类的继承与多态详细介绍 2022-04-17
- Python实战之MNIST手写数字识别详解 2022-04-17
- Python实现自动玩贪吃蛇程序 2022-04-17