OpenCV-Python图像轮廓之轮廓特征详解
脚本宝典收集整理的这篇文章主要介绍了OpenCV-Python图像轮廓之轮廓特征详解,脚本宝典觉得挺不错的,现在分享给大家,也给大家做个参考。
前言
图像轮廓是指由位于边缘、连续的、具有相同颜色和强度的点构成的曲线,它可以用于形状分析以及对象检测和识别。
一、轮廓的矩
轮廓的矩包含了轮廓的各种几何特征,如面积、位置、角度、形状等。cv2.moments()函数用于返回轮廓的矩,其基本格式如下:
ret = cv2.moments(array[, binaryImage])

ret为返回的轮廓的矩,是一个字典对象, 大多数矩的含义比较抽象, 但其中的零阶矩(m00)表示轮廓的面积
array为表示轮廓的数组
binaryImage值为True时,会将array对象中的所有非0值设置为1
import cv2
import numpy as np
import matplotlib.pyplot as plt

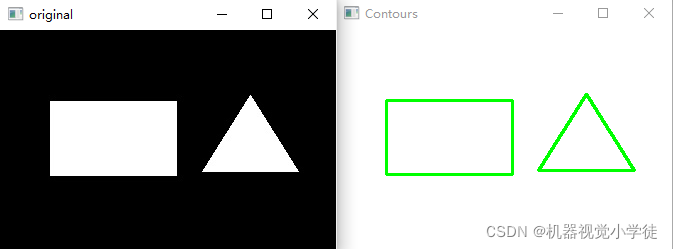
img = cv2.imread('Shape2.jpg')
cv2.imshow('original', img)

img_gray = cv2.cvtColor(img, cv2.COLOR_BGR2GRAY)

ret, thresh = cv2.threshold(img_gray, 125, 255, cv2.THRESH_BINARY)

contours, hier@R_304_2413@y = cv2.findContours(thresh, cv2.RETR_TREE, cv2.CHaiN_APPROX_SIMPLE)

img1 = np.zeros(img.shaPE, np.uint8) + 255

img1 = cv2.drawContours(img1, contours, -1,(0,255,0),2)
cv2.imshow('Contours',img1)

m0 = cv2.moments(contours[0])
m1 = cv2.moments(contours[1])

print('轮廓0的矩:', m0)
print('轮廓1的矩:', m1)

print('轮廓0的面积:', m0['m00'])
print('轮廓1的面积:', m1['m00'])

cv2.waITKey(0)
cv2.destroyAllWindows()


二、轮廓的面积
cv2.contourArea()函数用于返回轮廓的面积,其基本格式如下:
ret = cv2.contourArea(contour[, oriented])

ret为返回的面积
contour为轮廓
oriented为可选参数, 其参数值为True时, 返回值的正与负表示表示轮廓是顺时针还是逆时针, 参数值为False(默认值)时, 函数返回值为绝对值
img = cv2.imread('shape2.jpg')

img_gray = cv2.cvtColor(img, cv2.COLOR_BGR2GRAY)

ret, thresh = cv2.threshold(img_gray, 125, 255, cv2.THRESH_BINARY)

contours, hierarchy = cv2.findContours(thresh, cv2.RETR_TREE, cv2.CHAIN_APPROX_SIMPLE)

m0 = cv2.contourArea(contours[0])
m1 = cv2.contourArea(contours[1])

print('轮廓0的面积:', m0)
print('轮廓1的面积:', m1)

三、轮廓的长度
cv2.arcLength()函数用于返回轮廓的长度,其基本格式如下:
ret = cv2.cv2.arcLength(contour, closed)

ret为返回的长度
contour为轮廓
closed为布尔值, 为True时表示轮廓是封闭的
img = cv2.imread('shape2.jpg')

img_gray = cv2.cvtColor(img, cv2.COLOR_BGR2GRAY)

ret, thresh = cv2.threshold(img_gray, 125, 255, cv2.THRESH_BINARY)

contours, hierarchy = cv2.findContours(thresh, cv2.RETR_TREE, cv2.CHAIN_APPROX_SIMPLE)

m0 = cv2.arcLength(contours[0], True)
m1 = cv2.arcLength(contours[1], True)

print('轮廓0的长度:', m0)
print('轮廓1的长度:', m1)

四、轮廓的近似多边形
cv2.approxpolyDP()函数用于返回轮廓的近似多边形,其基本格式如下:
ret = cv2.cv2.arcLength(contour, epsilon, closed)

ret为返回的近似多边形
contour为轮廓
epsilon为精度, 表示近似多边形接近轮廓的最大距离
closed为布尔值, 为True时表示轮廓是封闭的
img = cv2.imread('shape3.jpg')
cv2.imshow('original', img)

img_gray = cv2.cvtColor(img, cv2.COLOR_BGR2GRAY)

ret, thresh = cv2.threshold(img_gray, 125, 255, cv2.THRESH_BINARY)

contours, hierarchy = cv2.findContours(thresh, cv2.RETR_TREE, cv2.CHAIN_APPROX_SIMPLE)

img1 = np.zeros(img.shape, np.uint8) + 255
img1 = cv2.drawContours(img1, contours, -1, (0,0,255), 2)
cv2.imshow('Contours',img1)

arcl = cv2.arcLength(contours[0], True)

img2 = img1.copy()
app = cv2.approxPolyDP(contours[0], arcl*0.05, True)
img2 = cv2.drawContours(img2, [app], -1, (255,0,0), 2)
cv2.imshow('contours',img2)

cv2.waitKey(0)
cv2.destroyAllWindows()

五、轮廓的凸包
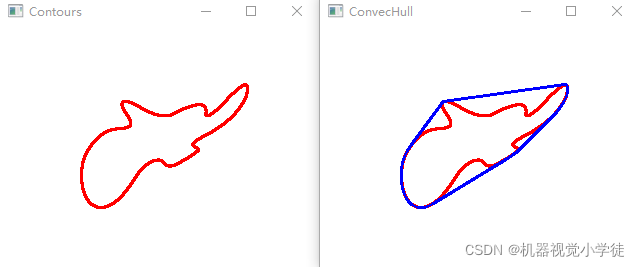
cv2.convexHull()函数用于返回轮廓的凸包,其基本格式如下:
hull = cv2.convexHull(contours[, clockwise[, returnPointss]])

hull为返回的凸包, 是一个numpy.ndarray对象, 包含了凸包的关键点
contours为轮廓
clockwise为方向标记, 为True时, 凸包为顺时针方向, 为False(默认值)时, 凸包为逆时针方向
returnPointss为True时(默认值)时, 返回的hull中包含的是凸包关键点的坐标, 为False时, 返回的是凸包关键点在轮廓中的索引
img = cv2.imread('shape3.jpg')

img_gray = cv2.cvtColor(img, cv2.COLOR_BGR2GRAY)

ret, thresh = cv2.threshold(img_gray, 125, 255, cv2.THRESH_BINARY)

contours, hierarchy = cv2.findContours(thresh, cv2.RETR_TREE, cv2.CHAIN_APPROX_SIMPLE)

img1 = np.zeros(img.shape, np.uint8) + 255
img1 = cv2.drawContours(img1, contours, -1, (0,0,255), 2)
cv2.imshow('Contours',img1)

hull = cv2.convexHull(contours[0])
print('returnPoints = Treu 时返回的凸包;\n',hull)

hull2 = cv2.convexHull(contours[0], returnPoints=False)
print('returnPoints = False时返回的凸包;\n',hull2)

cv2.polylines(img1, [hull], True, (255,0,0),2)
cv2.imshow('ConvecHull',img1)

cv2.waitKey(0)
cv2.destroyAllWindows()


六、轮廓的直边界矩形
轮廓的直边界矩形是指可容纳轮廓的矩形,且矩形的两条边必须是平行的,直边界矩形不一定是面积最小的边界矩形。
cv2.boundingRect()函数用于返回轮廓的直边界矩形,其基本格式如下:
ret = cv2.boundingRect(contours)

ret为返回的直边界矩形, 它是一个四元组, 其格式为(矩形左上角x坐标, 矩形左上角y坐标, 矩形的宽度, 矩形的高度)
contours为用于计算直边界矩形的轮廓
img = cv2.imread('shape4.jpg')
cv2.imshow('original', img)

img_gray = cv2.cvtColor(img, cv2.COLOR_BGR2GRAY)

ret, thresh = cv2.threshold(img_gray, 125, 255, cv2.THRESH_BINARY)

contours, hierarchy = cv2.findContours(thresh, cv2.RETR_TREE, cv2.CHAIN_APPROX_SIMPLE)

img1 = np.zeros(img.shape, np.uint8) + 255

img1 = cv2.drawContours(img1, contours, -1, (0,0,255), 2)
cv2.imshow('Contours',img1)

ret = cv2.boundingRect(contours[0])
print('直边界矩形:\n', ret)

pt1 = (ret[0], ret[1])
pt2 = (ret[0] + ret[2], ret[1] + ret[3])
img2 = img1.copy()
img2 = cv2.rectangle(img2, pt1, pt2, (255,0,0), 1)
cv2.imshow('Rectangle', img2)

cv2.waitKey(0)
cv2.destroyAllWindows()


七、轮廓的旋转矩形
轮廓的旋转矩形是指可容纳轮廓的面积最小的矩形。
cv2.minAreaRect()函数用于返回轮廓的旋转矩形,其基本格式如下:
box = cv2.minAreaRect(contour)

box为返回的旋转矩阵, 它是一个三元组, 其格式为((矩形中心点x坐标, 矩形中心点y坐标), (矩形的宽度, 矩形的高度), 矩形的旋转角度)
contour为用于计算矩形的轮廓
cv2.minAreaRect()函数返回的结果不能直接用于绘制旋转矩形,可以使用cv2.boxPoints()函数将其转换为矩形的顶点坐标,其基本格式如下:
points = cv2.boxPoints(box)

points为返回的矩形顶点坐标, 坐标数据为浮点数
box为cv2.minAreaRect()函数返回的矩形数据
img = cv2.imread('shape4.jpg')
cv2.imshow('original', img)

img_gray = cv2.cvtColor(img, cv2.COLOR_BGR2GRAY)

ret, thresh = cv2.threshold(img_gray, 125, 255, cv2.THRESH_BINARY)

contours, hierarchy = cv2.findContours(thresh, cv2.RETR_TREE, cv2.CHAIN_APPROX_SIMPLE)

img1 = np.zeros(img.shape, np.uint8) + 255
cv2.drawContours(img1, contours, -1, (0,0,255) ,2)
cv2.imshow('Contours',img1)

# 计算最小旋转矩形
ret = cv2.minAreaRect(contours[0])
rect = cv2.boxPoints(ret)
rect = np.int0(rect)

img2 = img1.copy()
cv2.drawContours(img2, [rect], 0, (255,0,0), 2)
cv2.imshow('Rectangle', img2)

cv2.waitKey(0)
cv2.destroyAllWindows()

八、轮廓的最小外包圆
cv2.minEnclosingCircle()函数用于返回可容纳轮廓的最小外包圆,其基本格式如下:
img = cv2.imread('shape4.jpg')
cv2.imshow('original', img)

img_gray = cv2.cvtColor(img, cv2.COLOR_BGR2GRAY)

ret, thresh = cv2.threshold(img_gray, 125, 255, cv2.THRESH_BINARY)

contours, hierarchy = cv2.findContours(thresh, cv2.RETR_TREE, cv2.CHAIN_APPROX_SIMPLE)

img1 = np.zeros(img.shape, np.uint8) + 255
cv2.drawContours(img1, contours, -1, (0,0,255) ,2)
cv2.imshow('Contours',img1)

# 计算最小外包圆
(x, y), radius = cv2.minEnclosingCircle(contours[0])
center = (int(x),int(y))
radius = int(radius)

img2 = img1.copy()
cv2.circle(img2, center, radius, (255,0,0),2)
cv2.imshow('Circle',img2)

cv2.waitKey(0)
cv2.destroyAllWindows()

九、轮廓的拟合椭圆
cv2.fitEllipse()函数用于返回轮廓的拟合椭圆,其基本格式如下:
ellipse = cv2.fitEllipse(contours)

ellipse为返回的椭圆
contours为用于计算拟合椭圆的轮廓
img = cv2.imread('shape4.jpg')
cv2.imshow('original', img)

img_gray = cv2.cvtColor(img, cv2.COLOR_BGR2GRAY)

ret, thresh = cv2.threshold(img_gray, 125, 255, cv2.THRESH_BINARY)

contours, hierarchy = cv2.findContours(thresh, cv2.RETR_TREE, cv2.CHAIN_APPROX_SIMPLE)

img1 = np.zeros(img.shape, np.uint8) + 255
cv2.drawContours(img1, contours, -1, (0,0,255) ,2)
cv2.imshow('Contours',img1)

# 计算拟合椭圆
ellipse = cv2.fitEllipse(contours[0])

img2 = img1.copy()
cv2.ellipse(img2, ellipse, (255,0,0),2)
cv2.imshow('Circle',img2)

cv2.waitKey(0)
cv2.destroyAllWindows()

十、轮廓的拟合直线
cv2.fitLine()函数用于返回轮廓的拟合直线,其基本格式如下:
line = cv2.fitLine(contours, distType, param, reps, aeps)

line为返回的拟合直线
contours为用于计算拟合直线的轮廓
distType为距离参数类型, 决定如何计算拟合直线
param为距离参数, 与距离参数类型有关, 其设置为0时, 函数将自动选择最优值
reps为计算拟合直线需要的径向精度, 通常设置为0.01
aeps为计算拟合直线需要的轴向精度, 通常设置为0.01
param距离参数类型:

img = cv2.imread('shape4.jpg')
cv2.imshow('original', img)

img_gray = cv2.cvtColor(img, cv2.COLOR_BGR2GRAY)

ret, thresh = cv2.threshold(img_gray, 125, 255, cv2.THRESH_BINARY)

contours, hierarchy = cv2.findContours(thresh, cv2.RETR_TREE, cv2.CHAIN_APPROX_SIMPLE)

img1 = np.zeros(img.shape, np.uint8) + 255
cv2.drawContours(img1, contours, -1, (0,0,255), 2)
cv2.imshow('Contours',img1)

#计算拟合直线
img2 = img1.copy()
rows, cols = img.shape[:2]
[vx, vy, x, y] = cv2.fitLine(contours[0], cv2.DIST_L1, 0, 0.01, 0.01)
lefty = int((-x * vy / vx) + y)
righty = int(((cols - x) * vy / vx) + y)
cv2.line(img2, (0, lefty), (cols-1, righty), (255,0,0), 2)

cv2.imshow('FitLine',img2)
cv2.waitKey(0)
cv2.destroyAllWindows()

十一、轮廓的最小外包三角形
cv2.minEnclosingTriangle()函数用于返回可容纳轮廓的最小外包三角形,其基本格式如下:
retval, triangle = cv2.minEnclosingTriangle(contours)

retval为最小外包三角形的面积
triangle为最小外包三角形
contours为用于计算最小外包三角形的轮廓
img = cv2.imread('shape4.jpg')
cv2.imshow('original', img)

img_gray = cv2.cvtColor(img, cv2.COLOR_BGR2GRAY)

ret, thresh = cv2.threshold(img_gray, 125, 255, cv2.THRESH_BINARY)

contours, hierarchy = cv2.findContours(thresh, cv2.RETR_TREE, cv2.CHAIN_APPROX_SIMPLE)

img1 = np.zeros(img.shape, np.uint8) + 255
cv2.drawContours(img1, contours, -1, (0,0,255) ,2)
cv2.imshow('Contours',img1)

# 计算最小外包三角形
retval, triangle = cv2.minEnclosingTriangle(contours[0])
triangle = np.int0(triangle)

img2 = img1.copy()
cv2.polylines(img2, [triangle], True, (255,0,0),2)
cv2.imshow('Triangle',img2)

cv2.waitKey(0)
cv2.destroyAllWindows()

以上就是OpenCV-Python图像轮廓之轮廓特征详解的详细内容,更多关于OpenCV-Python轮廓特征的资料请关注脚本宝典其它相关文章!
脚本宝典总结
以上是脚本宝典为你收集整理的OpenCV-Python图像轮廓之轮廓特征详解全部内容,希望文章能够帮你解决OpenCV-Python图像轮廓之轮廓特征详解所遇到的问题。
本图文内容来源于网友网络收集整理提供,作为学习参考使用,版权属于原作者。
如您有任何意见或建议可联系处理。小编QQ:384754419,请注明来意。
- python怎么读excel 2022-05-15
- Python Pygame实战之打地鼠小游戏 2022-04-17
- Django admin实现TextField字段changelist页面换行、空格正常显示 2022-04-17
- 基于Python实现的恋爱对话小程序详解 2022-04-17
- 分享6 个值得收藏的 Python 代码 2022-04-17
- python+appium实现自动化测试的示例代码 2022-04-17
- Python实现带GUI界面的手写数字识别 2022-04-17
- Python类的继承与多态详细介绍 2022-04-17
- Python实战之MNIST手写数字识别详解 2022-04-17
- Python实现自动玩贪吃蛇程序 2022-04-17